Writing an Editor Extension to Customize Mesh Colours in Unity
I’m an engineer and a programmer, not an artist. This sometimes becomes an issue for me when I work on games as while I can make the game technically sound, the art is often downright horrible, or I spend way more time on it than I have any right to. I’m currently working on a long-term, back-burner type game project to keep me busy and distracted when I occasionally need a break from real life. Programming-wise, I’m fine, but what’s a game without art? Well, aside from Dwarf Fortress and most Roguelikes out there, it’s not much. Fortunately, I recently stumbled across (what I think) is a great art style: geometric assets, as shown below:
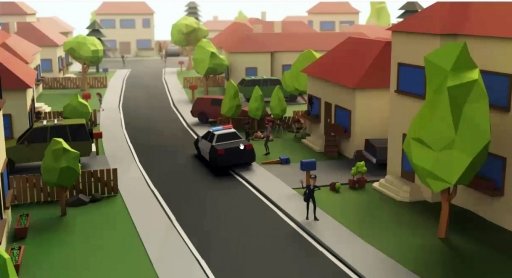
This is an art style that while it may take some ability to master and look great, I think it can look decent with relatively minimal work. Note that it is also really low-poly, so creating assets this way is great for mobile games (including things like the Ouya). For information on creating this look in Blender, I can’t recommend enough the cgcookie tutorial on it written / presented by Metalix Studios. After creating these assets, we must import them into Unity. Since Unity has such great support for Blender files, this is more or less of a non-issue, however when the models get imported into Unity they must use a special shader which will allow the colour to come out (these models aren’t textured at all). Metalix has also written a tutorial on this, but I found their script a bit cumbersome to use to colour meshes with, so I decided to mod it a bit for my own use.
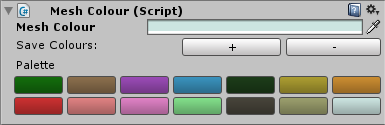
My custom script makes use of an editor-extension to support multi-object colour editing as well as a saved palette of colours that you can easily pick from. This will take the inspector for these meshes from something that looks like:

Into something that looks like:
Since I try to organize my projects extensively, I started by creating a new script in a folder called Assets/Scripts/Customizations/MeshColour.cs, with the contents:
using UnityEngine;
using System.Collections.Generic;

public class MeshColour : MonoBehaviour
{
    public Color meshColour = Color.blue;
    public static HashSet<Color> savedColours = new HashSet<Color>();
}
Note that there isn’t anything special here, other than remembering a mesh’s colour and keeping a static list of all colours in our palette. The real magic happens in a file I called Assets/Scripts/Customizations/Editor/MeshColourEditor.cs. Note that editor customization scripts MUST be located in a folder called Editor for them to work. Start off by adding the following to the file:
using UnityEngine;
using UnityEditor;
using System.Collections.Generic;

[CustomEditor(typeof(MeshColour))]
[CanEditMultipleObjects]
public class MeshColourEditor : Editor
{

}
This just sets up the class to be an extension of the Editor class, for the MeshColour class defined before, and enabled multi-object editing on it. Multi-object editing is so that I can select say 5 trees and make them all the same colour at once rather than having to select each one individually. Next, we create a colour property which can be exposed to the user:
using UnityEngine;
using UnityEditor;
using System.Collections.Generic;

[CustomEditor(typeof(MeshColour))]
[CanEditMultipleObjects]
public class MeshColourEditor : Editor
{
    SerializedProperty colourProp;
    public void OnEnable()
    {
        colourProp = serializedObject.FindProperty("meshColour");
    }

    public override void OnInspectorGUI()
    {
        // always do this at the beginning of OnInspectorGUI
        serializedObject.Update();

        // allow us to change our mesh colours
        EditorGUILayout.PropertyField(colourProp);
        serializedObject.ApplyModifiedProperties();
    }
}
What this did was allow us to change the colour of the colour property (which points to the MeshColour.meshColour variable we defined in MeshColour.cs) across all the selected instances of objects with the MeshColour script attached. However, the script still isn’t that useful: if you run the script at this point, it won’t do anything (or at least, it won’t seem like it’s doing anything, as it’s just changing the meshColour property, which doesn’t actually apply colours to the meshes). In order to apply the mesh colour to the selected meshes, we’re going to need some more code:
using UnityEngine;
using UnityEditor;
using System.Collections.Generic;

[CustomEditor(typeof(MeshColour))]
[CanEditMultipleObjects]
public class MeshColourEditor : Editor
{
    SerializedProperty colourProp;
    public void OnEnable()
    {
        colourProp = serializedObject.FindProperty("meshColour");

        // get our selected game objects
        Transform[] transforms = Selection.GetTransforms(
              SelectionMode.Deep
            | SelectionMode.ExcludePrefab
            | SelectionMode.OnlyUserModifiable);
        meshes.Clear();
        // loop over our selected transforms
        foreach(Transform transform in transforms)
        {
            // we have to instantiate a new mesh and set this objects mesh to the new one
            MeshFilter mf = transform.GetComponent<MeshFilter>();
            if (mf == null)
            {
                continue;
            }
            Mesh meshCopy = Mesh.Instantiate(mf.sharedMesh) as Mesh;
            Mesh mesh = mf.mesh = meshCopy;
            mesh.name = mf.name;
            meshes.Add(mesh);
        }
    }

    public override void OnInspectorGUI()
    {
        // always do this at the beginning of OnInspectorGUI
        serializedObject.Update();

        // allow us to change our mesh colours
        EditorGUILayout.PropertyField(colourProp);
        serializedObject.ApplyModifiedProperties();

        // if we updated anything, update our mesh colours
        if (GUI.changed)
        {
            foreach (Mesh mesh in meshes)
            {
                Color[] colours = new Color[mesh.vertices.Length];
                for (int i = 0; i < colours.Length; i++)
                {
                    colours[i] = colourProp.colorValue;
                }
                mesh.colors = colours;
            }
        }
    }
}
A lot changed here, but I will try to go over it all. First up, in the OnEnable function, we get a list of all the transforms that the user has currently selected using Selection.GetTransforms. The options here will pick up all child transforms that aren’t prefabs (we don’t want to mess with those) and that are actually modifiable. Next, we go through our list of transforms and collect a list of all the meshes that are associated with those transforms (skipping any transforms that don’t have a mesh attached). For each mesh that we have, we actually instantiate a new copy of the shared mesh. This will result in a new mesh being created for each object (instead of each object sharing the same mesh) which will allow us to have multiple models but with different colours. Note that doing this will increase the number of draw calls, but I will address this issue in my next post. This OnEnable function will be called each time we select an object with the MeshColour script on it, so this list will only be updated when we select objects (which is what we want anyway). Next up, in the OnInspectorGUI function, we check if anything changed in the GUI (either the selected colour changed, or a button was pressed, etc). If something need change, we loop through all our previously stored meshes. For each of those meshes, we loop through all the vertices of that mesh and assign the new colour to those vertices. Once we’ve assigned all the colours, we store it back in the mesh, and we’re good to go!
The above script works great, but I find it beneficial to generate a “palette” when I’m creating these assets so that I can quickly set the “trunk” colour of all my trees to be the same brown, for instance. While the Unity colour picker does allow you to save preset colours, you can’t access them until you’ve clicked on the colour box and moved your mouse over to the window - an inefficiency we can [relatively] easily solve. To add this functionality, we get to the following version of the script:
using UnityEngine;
using UnityEditor;
using System.Collections.Generic;

[CustomEditor(typeof(MeshColour))]
[CanEditMultipleObjects]
public class MeshColourEditor : Editor
{
    SerializedProperty colourProp;
    List<Mesh> meshes = new List<Mesh>();
    public void OnEnable()
    {
        colourProp = serializedObject.FindProperty("meshColour");

        // get our selected game objects
        Transform[] transforms = Selection.GetTransforms(
              SelectionMode.Deep
            | SelectionMode.ExcludePrefab
            | SelectionMode.OnlyUserModifiable);
        meshes.Clear();
        // loop over our selected transforms
        foreach(Transform transform in transforms)
        {
            // we have to instantiate a new mesh and set this objects mesh to the new one
            MeshFilter mf = transform.GetComponent<MeshFilter>();
            if (mf == null)
            {
                continue;
            }
            Mesh meshCopy = Mesh.Instantiate(mf.sharedMesh) as Mesh;
            Mesh mesh = mf.mesh = meshCopy;
            mesh.name = mf.name;
            meshes.Add(mesh);
        }
    }

    public override void OnInspectorGUI()
    {
        // always do this at the beginning of OnInspectorGUI
        serializedObject.Update();

        // allow us to change our mesh colours
        EditorGUILayout.PropertyField(colourProp);
        serializedObject.ApplyModifiedProperties();

        GUILayout.BeginHorizontal();
        GUILayout.Label("Save Colours:");
        if (GUILayout.Button("+"))
        {
            MeshColour.savedColours.Add(colourProp.colorValue);
        }
        if (GUILayout.Button("-"))
        {
            MeshColour.savedColours.Remove(colourProp.colorValue);
        }
        GUILayout.EndHorizontal();

        // display our saved colours list
        GUILayout.Label("Palette");
        HashSet<Color>.Enumerator enu = MeshColour.savedColours.GetEnumerator();
        bool hasNext = enu.MoveNext();
        while (hasNext)
        {
            GUILayout.BeginHorizontal();
            for (int x = 0; x < 7 && hasNext; x++)
            {
                GUI.color = enu.Current;
                hasNext = enu.MoveNext();
                if (GUILayout.Button(" "))
                {
                    colourProp.colorValue = GUI.color;
                    serializedObject.ApplyModifiedProperties();
                }
            }
            GUILayout.EndHorizontal();
        }

        // if we updated anything, update our mesh colours
        if (GUI.changed)
        {
            foreach (Mesh mesh in meshes)
            {
                Color[] colours = new Color[mesh.vertices.Length];
                for (int i = 0; i < colours.Length; i++)
                {
                    colours[i] = colourProp.colorValue;
                }
                mesh.colors = colours;
            }
        }
    }
}
What this added code does is first add two buttons (and a label) in a horizontal line across the inspector. When the + button is clicked, it simply adds the current selected colour to the static list stored in the MeshColour class (the palette of colours is stored as a HashSet so that we don’t get duplicate colours). Similarly, - removes the colour. Next, we draw the Palette. We loop over every colour in our list, and for every 7 colours, we start a new horizontal row. In that row, we set the GUI colour to the current palette colour a draw an empty button for the user to click on. If they do click on it, we set the colour property to the saved colour and make sure to update it with serializedObject.ApplyModifiedProperties() (otherwise the colour picker won’t get updated). And that’s it!
With this script in place we can now easily colour meshes to our hearts content! There’s just one more thing we can do to make our lives a bit easier, and that’s to create an easy way to add this script to all the meshes we want to colourize. I do that by adding a menu item to unity that when pressed will add the MeshColour script to all selected objects with both a MeshFilter and a MeshRenderer component attached:
using UnityEngine;
using UnityEditor;
using System.Collections;

public class AddMeshColourEditor : EditorWindow
{
    // add a menu item to add this component to all children
    [MenuItem("BlazingMammothGames/Geometric/Add Mesh Colour Editor")]
    static void AddEditor()
    {
        AddMeshColourEditor window = new AddMeshColourEditor();
        window.position = new Rect(Screen.width / 2, Screen.height / 2, 50, 25);
        window.ShowUtility();
    }

    [MenuItem("BlazingMammothGames/Geometric/Add Mesh Colour Editor", true)]
    static bool ValidateSelection()
    {
        return Selection.GetTransforms(
              SelectionMode.Deep
            | SelectionMode.ExcludePrefab
            | SelectionMode.OnlyUserModifiable).Length > 0;
    }

    private static Material addedMaterial = null;

    void OnGUI()
    {
        addedMaterial = (Material)EditorGUILayout.ObjectField("Material:",
                            addedMaterial, typeof(Material));
        if (GUILayout.Button("Add it!"))
        {
            // get all our selected transforms
            Transform[] transforms = Selection.GetTransforms(
              SelectionMode.Deep
            | SelectionMode.ExcludePrefab
            | SelectionMode.OnlyUserModifiable);

            // only add the component if there is both a mesh filter and a mesh renderer
            foreach (Transform transform in transforms)
            {
                if (   transform.GetComponent<MeshFilter>() != null
                    && transform.GetComponent<MeshRenderer>() != null)
                {
                    transform.gameObject.AddComponent<MeshColour>();
                    if (addedMaterial != null)
                    {
                        transform.gameObject.GetComponent<MeshRenderer>().material = addedMaterial;
                    }
                }
            }

            // close our window
            this.Close();
        }
    }
}
This code just adds a menu item (in the “BlazingMammothGames -> Geometric” menu section) that when clicked will show a popup window. With a place to put a material. This will be the material used when adding the MeshRenderer component. When the Add it! button is clicked, we loop through all the selected transforms and add the MeshColour component to each one that has both a MeshFilter and MeshRenderer component, injecting the material along the way.
Voilà!